
The beginning of the next project.
Page 1 of 2 • 1, 2 ![]()

The beginning of the next project.
![]() Doug Rahn January 25th 2011, 8:50 pm
Doug Rahn January 25th 2011, 8:50 pm
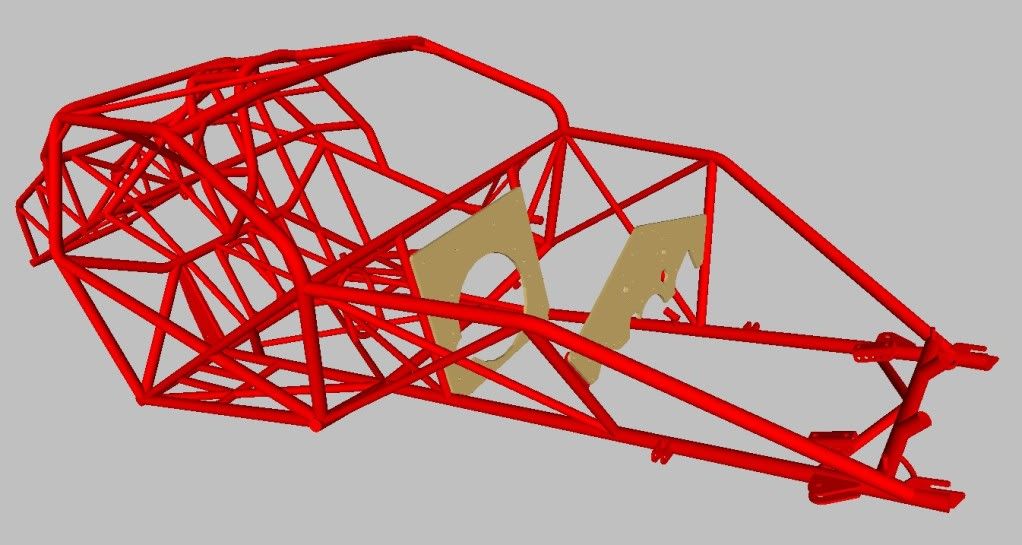
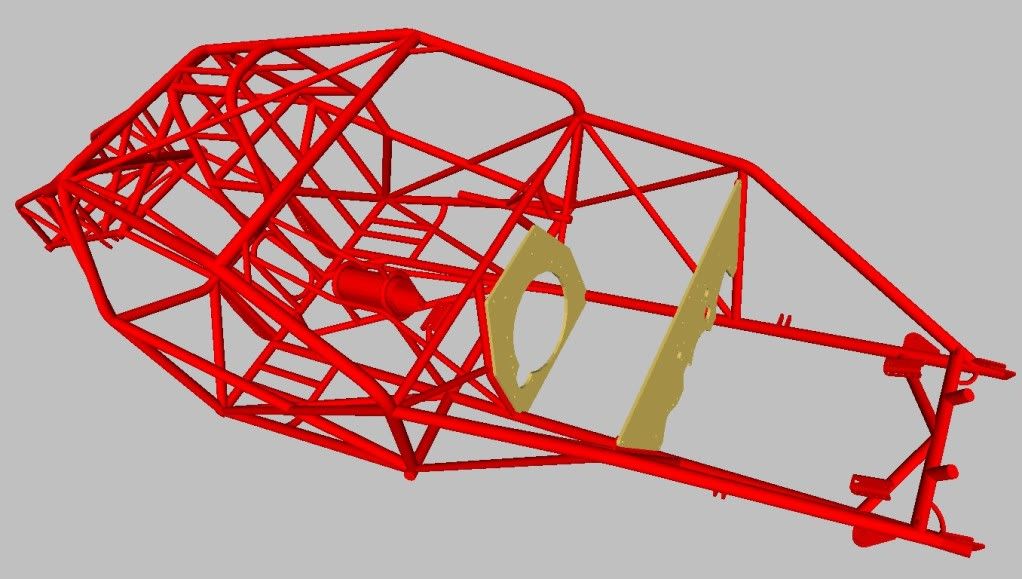
An all chromoly tube chassis powered by a big block Ford of coarse. This is definitely a long term project and I hope I'm around long enough to finish it. I finished the drawing for the chassis last night in my BendTech Pro program, the next thing is to build a chassis table to build it on. Should be a lot of fun

Doug Rahn- BBF CONTRIBUTOR

- Posts : 1680
Join date : 2009-08-07
Age : 72
Location : Springfield, GA -

Re: The beginning of the next project.
![]() bosshoss January 25th 2011, 10:11 pm
bosshoss January 25th 2011, 10:11 pm
dkp

bosshoss- BBF CONTRIBUTOR
- Posts : 499
Join date : 2009-08-10
Re: The beginning of the next project.
![]() Race Ready Fabrications January 25th 2011, 11:14 pm
Race Ready Fabrications January 25th 2011, 11:14 pm

Race Ready Fabrications- Posts : 619
Join date : 2010-04-19
Age : 43
Location : Chandler, IN
Re: The beginning of the next project.
![]() cool40 January 25th 2011, 11:18 pm
cool40 January 25th 2011, 11:18 pm

cool40- BBF CONTRIBUTOR
- Posts : 7308
Join date : 2009-08-31
Age : 53
Location : on the 1/8 mile dyno
Re: The beginning of the next project.
![]() Doug Rahn January 25th 2011, 11:31 pm
Doug Rahn January 25th 2011, 11:31 pm
bosshoss wrote:Wow Doug that is some very nice work right there. Looks awesome. I have been thinking about upgrading my Bend Tech EZ program that looks very cool from here. Dont forget to add the Kidney bar on the driver side. Looks like the engine is way back there should be a way cool ride when done.
dkp
Thanks, I missed that one. I just upgrade my older version of BendTech Pro from 4.0.03 to the new 5.01.02 and they made me a good deal on their new BendTech SM program module (Plate & Sheetmetal). After you draw up a plate or sheetmetal part you can intergrate it into the tube program, very cool
Doug Rahn- BBF CONTRIBUTOR
- Posts : 1680
Join date : 2009-08-07
Age : 72
Location : Springfield, GA -
Re: The beginning of the next project.
![]() IDT-572 January 26th 2011, 1:00 am
IDT-572 January 26th 2011, 1:00 am
IDT-572- BBF CONTRIBUTOR
- Posts : 4628
Join date : 2008-12-02
Age : 63
Location : Shelbyville Tn.
Re: The beginning of the next project.
![]() DILLIGASDAVE January 26th 2011, 1:08 am
DILLIGASDAVE January 26th 2011, 1:08 am
It looks like you did some in depth research & ended up with a nice mix of influences from some of the better chassis shops out there. What size slicks are you planning on using. The 65 Mustang should be easier to fit slicks/tubs higher up inside the body than say a 69/70 Mustang is.
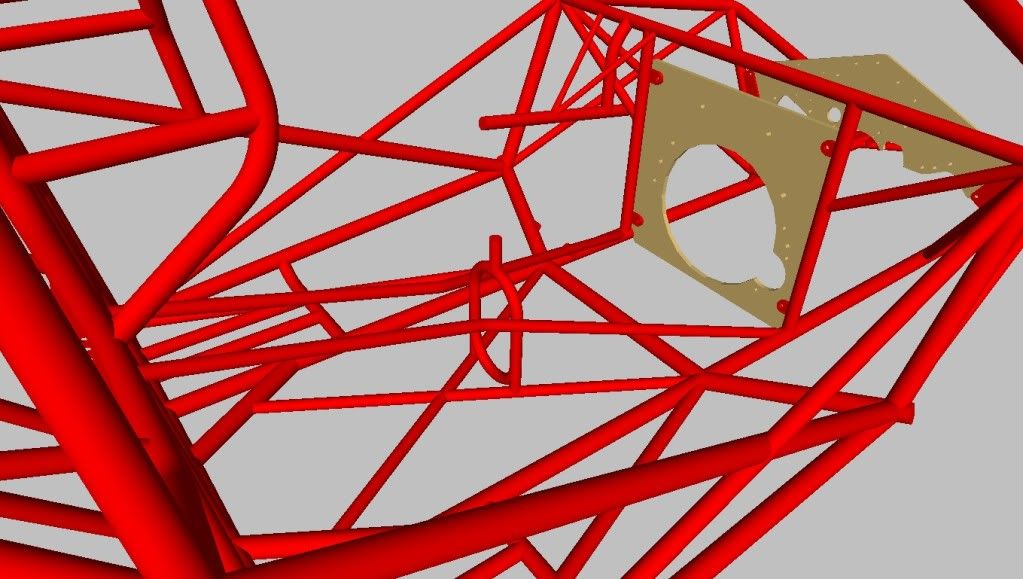
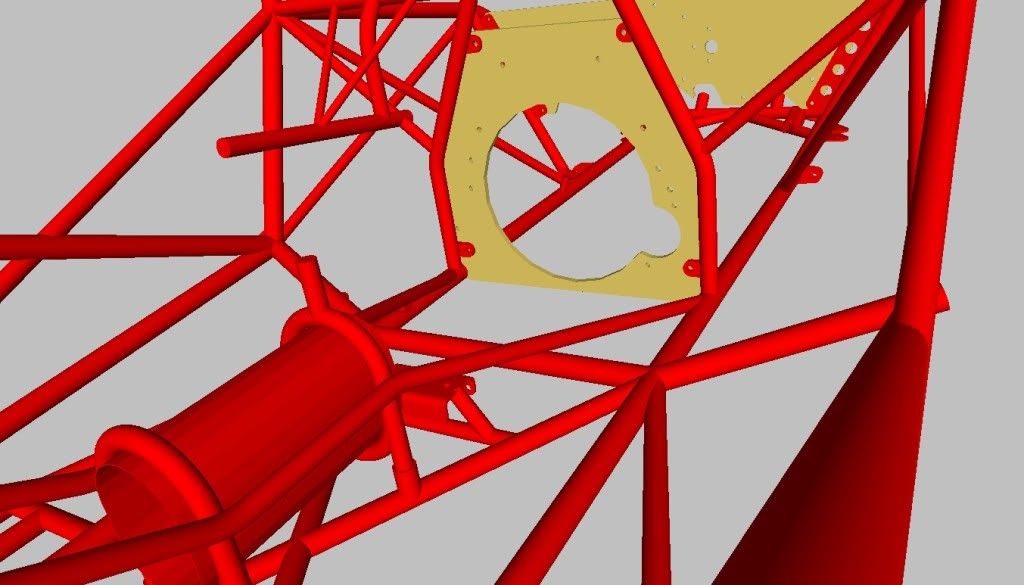
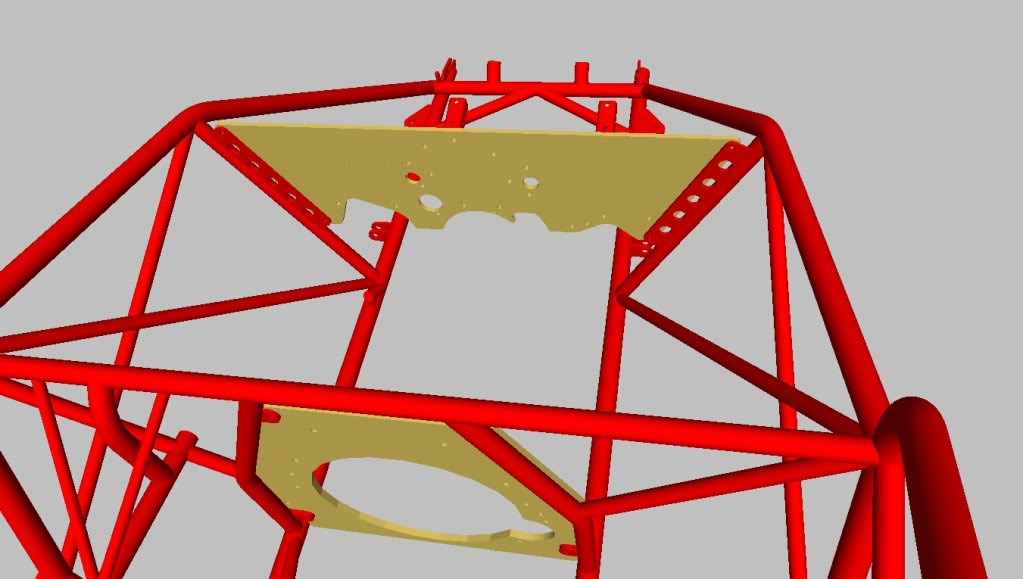
One thing I would change is making the front motor plate flat/flatter across the top & move the mounting brackets/bolts higher up, instead of dipping down each side. That way the motor plate will attach to the uprights as close to the top as possible instead of in the center of the uprights. Doing this better supports the top strut mounts & reduces the chance of cracking/breaking the unsupported middle of the upright tubing.
Also don't forget two add the small diagonals to help support the rear bumper crossmember at the 'chute tether mount area.

DILLIGASDAVE- Posts : 2262
Join date : 2009-08-08
Location : Texas. pronounced "texASS"
Clean
![]() 70429scj January 26th 2011, 3:07 pm
70429scj January 26th 2011, 3:07 pm
I use autocad and soild works every day but I don't get to do anything as cool as what you have done. Good luck and be persistant with finishing it.

70429scj- Posts : 348
Join date : 2009-08-07
Re: The beginning of the next project.
![]() dfree383 January 26th 2011, 3:16 pm
dfree383 January 26th 2011, 3:16 pm

dfree383- BBF CONTRIBUTOR
- Posts : 14800
Join date : 2009-07-09
Location : Home Wif Da Wife.....
Re: The beginning of the next project.
![]() jones January 26th 2011, 3:41 pm
jones January 26th 2011, 3:41 pm
jones- Posts : 2230
Join date : 2008-12-02
Location : Philadelphia, MS.
Re: The beginning of the next project.
![]() Doug Rahn January 26th 2011, 6:41 pm
Doug Rahn January 26th 2011, 6:41 pm
Thanks, I thought about going fiberglass, but I also like the idea of using an original body. It's still early and things do change.IDT-572 wrote:Cool Doug I'm doing the same thing...................But I couldn't bring myself to using my 66 Fastback, I'm going fiberglass body
Ky and I are going to make a mold off of my car.
Thanks, 90% of it is from a Jerry Bickel blueprint. The motorplate in the drawing is my current one in the '90 Mustang, I just threw it in there for looks. Thanks for the tips, that's why I like this forum, more eyes to catch things.DILLIGASDAVE wrote:Looks good Doug.
It looks like you did some in depth research & ended up with a nice mix of influences from some of the better chassis shops out there. What size slicks are you planning on using. The 65 Mustang should be easier to fit slicks/tubs higher up inside the body than say a 69/70 Mustang is.
One thing I would change is making the front motor plate flat/flatter across the top & move the mounting brackets/bolts higher up, instead of dipping down each side. That way the motor plate will attach to the uprights as close to the top as possible instead of in the center of the uprights. Doing this better supports the top strut mounts & reduces the chance of cracking/breaking the unsupported middle of the upright tubing.
Also don't forget two add the small diagonals to help support the rear bumper crossmember at the 'chute tether mount area.
If you have a CNC bender it will do that for you and you can print copies of the cuts to wrap around the tube to mark the coping. It doesn't do stress calculations but it will calculate the total weight if you put the information in the material library. Not including the brackets, plates, welding, etc. it weighs in at 257lbs. in tubing alone.dfree383 wrote:Nice Model Doug !! Does it actual do the design and stress calcs too?
Doug Rahn- BBF CONTRIBUTOR
- Posts : 1680
Join date : 2009-08-07
Age : 72
Location : Springfield, GA -
Re: The beginning of the next project.
![]() Doug Rahn January 26th 2011, 6:44 pm
Doug Rahn January 26th 2011, 6:44 pm
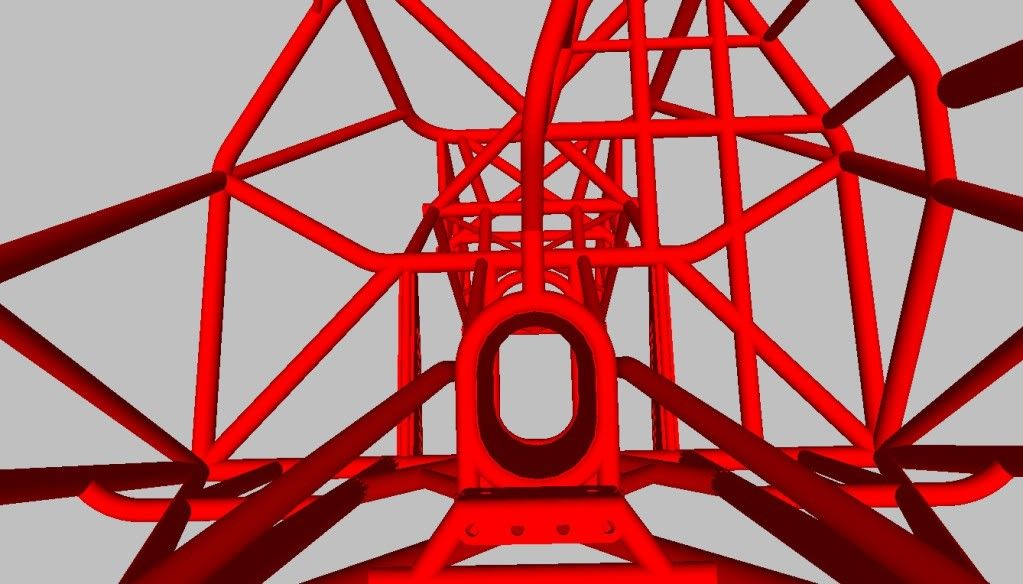
jones wrote:Why is the foot well area kicked up, exhaust clearance or structural? Looks like a tight fit in that area.
Header clearance. Actually the footwell area is almost 14 inches across right at the firewall.
Doug Rahn- BBF CONTRIBUTOR
- Posts : 1680
Join date : 2009-08-07
Age : 72
Location : Springfield, GA -
Re: The beginning of the next project.
![]() DILLIGASDAVE January 26th 2011, 8:56 pm
DILLIGASDAVE January 26th 2011, 8:56 pm
Like Doug said the floor kickup helps increase header collector/muffler collector room under low slung cars where the main frame rails might only be 3.5 to 4" off the ground.Doug Rahn wrote:jones wrote:Why is the foot well area kicked up, exhaust clearance or structural? Looks like a tight fit in that area.
Header clearance. Actually the footwell area is almost 14 inches across right at the firewall.
On cars that have zoomies, and/or the header collector exiting through/under the front fenders, the front floor kickup isn't a necessity. And the kickup isn't as important on cars that have a real short driver compartment combined with a real long front fender (like a P/M 115" wb early vette body) where the header collector might end up sitting a long ways away from the front floor/firewall area.
But even if say a zoomie is used & the floor kickup isn't really needed, using a kickup anyway can still sometimes be a good idea for future resale value cuz the car will fit more engine/header combos. Plus the higher the front floor kickup is, you end up using a little less of the 1-5/8" tubing in the car (it's not a butt load less big tubing, but every ounce counts).
DILLIGASDAVE- Posts : 2262
Join date : 2009-08-08
Location : Texas. pronounced "texASS"
Re: The beginning of the next project.
![]() DILLIGASDAVE January 26th 2011, 9:13 pm
DILLIGASDAVE January 26th 2011, 9:13 pm
I did notice at the Ennis ADRL event that Bickel has changed up how he does some of the rear bars (from the main hoop back) to make the back of his cars more rigid. But if you're not going to be using a power adder, your current design should be good.Doug Rahn wrote:...........90% of it is from a Jerry Bickel blueprint................
DILLIGASDAVE- Posts : 2262
Join date : 2009-08-08
Location : Texas. pronounced "texASS"
Re: The beginning of the next project.
![]() David Cole January 27th 2011, 12:58 am
David Cole January 27th 2011, 12:58 am
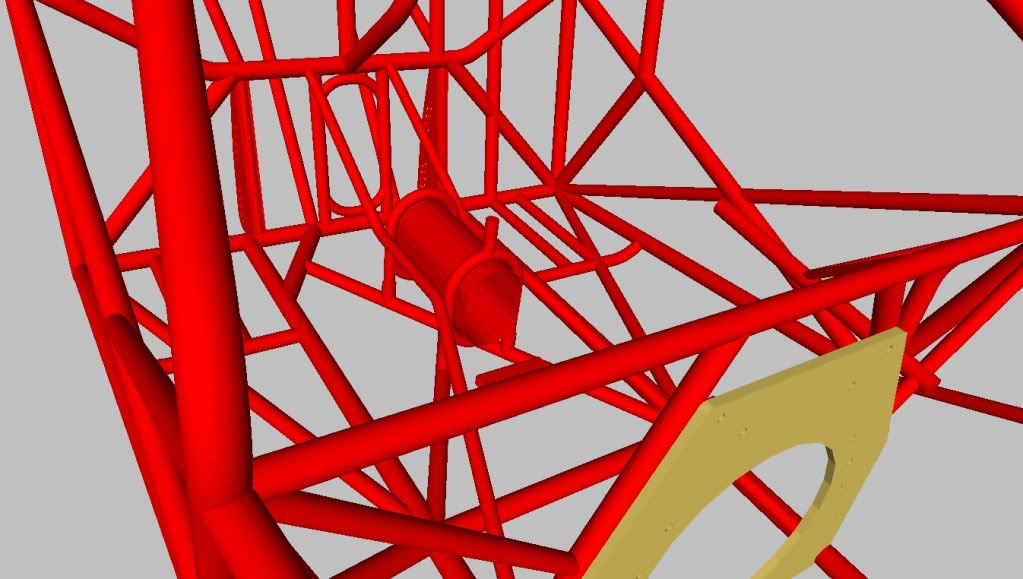
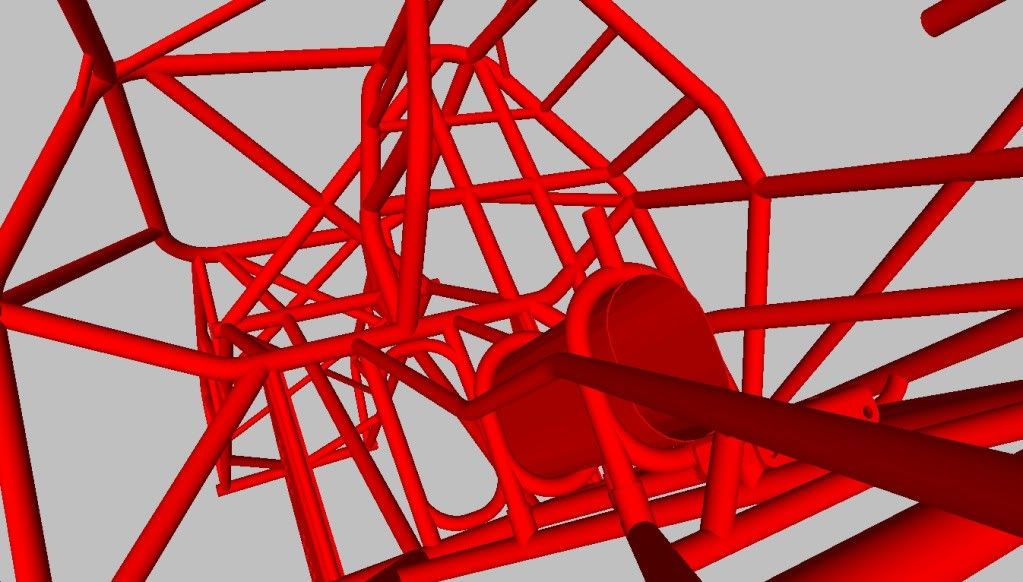
One new item from a rule revision that you might want to plan into the design is the new driveshaft tube. It's not just loops any longer. From the rule revisions for advanced ET:
Page 10
DRIVETRAIN: 2
DRIVELINE (December 13, 2010)
Beginning Jan. 1, 2012 all full-bodied vehicles, where the OEM floor has been
removed, each end of driveshaft must have round 360-degree driveshaft loops
within 6 inches of U-joints. Additionally, driveshaft must be covered by 360-
degree tube, covering the front U-joint and extending rearward a minimum 12
inches. Minimum thickness of tube is .050-inch chromoly or titanium. Driveshaft
tube must utilize a minimum of four attachment points to the chassis, either
bolted with minimum 5/16 SAE bolts or welded or 1/4-inch push/pull pins. See
General Regulations 2:4.
SECTION

David Cole- BBF CONTRIBUTOR
- Posts : 851
Join date : 2009-08-06
Location : Jasper, Al -
Re: The beginning of the next project.
![]() KY JELLY January 27th 2011, 9:38 am
KY JELLY January 27th 2011, 9:38 am

KY JELLY- Posts : 1530
Join date : 2008-12-03
Re: The beginning of the next project.
![]() Doug Rahn January 27th 2011, 11:33 am
Doug Rahn January 27th 2011, 11:33 am
David Cole wrote:Looks great!
One new item from a rule revision that you might want to plan into the design is the new driveshaft tube. It's not just loops any longer. From the rule revisions for advanced ET:
Page 10
DRIVETRAIN: 2
DRIVELINE (December 13, 2010)
Beginning Jan. 1, 2012 all full-bodied vehicles, where the OEM floor has been
removed, each end of driveshaft must have round 360-degree driveshaft loops
within 6 inches of U-joints. Additionally, driveshaft must be covered by 360-
degree tube, covering the front U-joint and extending rearward a minimum 12
inches. Minimum thickness of tube is .050-inch chromoly or titanium. Driveshaft
tube must utilize a minimum of four attachment points to the chassis, either
bolted with minimum 5/16 SAE bolts or welded or 1/4-inch push/pull pins. See
General Regulations 2:4.
SECTION
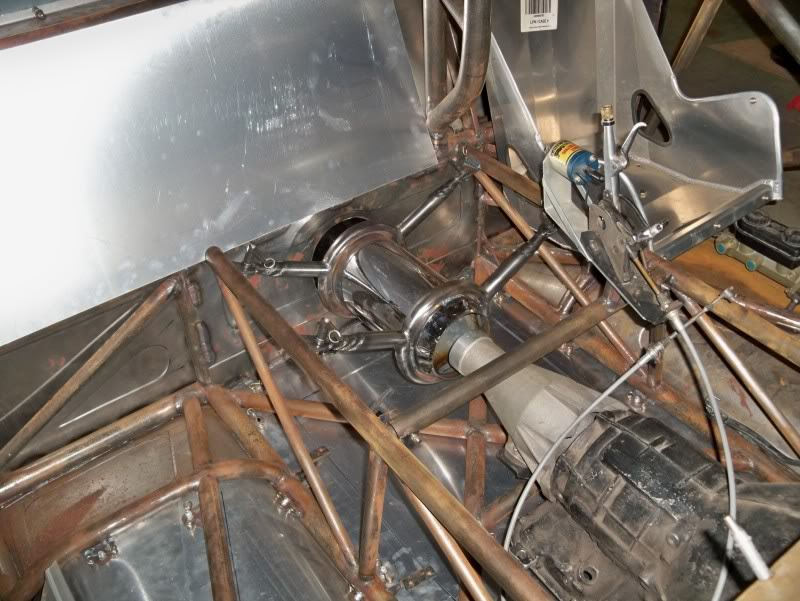
Thanks David, yep I knew about the rule change. I just haven't gotten around to adding all the little details. I forgot who's car this is, but this is basically what they're looking for.
Randy, it's the drawing perspective that makes it look like that. But going from memory it's somewhere around 75-80" from the back of the block to the axle center-line.KY JELLY wrote: How far is the back of the engine from the center of the axle that looks a tad far back from the drawing.
Doug Rahn- BBF CONTRIBUTOR
- Posts : 1680
Join date : 2009-08-07
Age : 72
Location : Springfield, GA -
Re: The beginning of the next project.
![]() KY JELLY January 27th 2011, 12:38 pm
KY JELLY January 27th 2011, 12:38 pm
My engine plate is still probably 6" in front of my dash bar. The back of my engine is right at 78" from the center of the axle with a 110" wheel base.
If Blake and I are able to construct a nice mold of his 65 and the first body turns out good I have full intentions of trying a complete carbon fiber body for myself . I don't care if its got paint on it or not I don't feel right driving a shiny race car anyway

Last edited by KY JELLY on January 27th 2011, 1:01 pm; edited 1 time in total
KY JELLY- Posts : 1530
Join date : 2008-12-03
Re: The beginning of the next project.
![]() David Willingham January 27th 2011, 12:44 pm
David Willingham January 27th 2011, 12:44 pm
David Willingham- BBF CONTRIBUTOR
- Posts : 495
Join date : 2008-12-02
Age : 51
Location : Blountsville, AL
Re: The beginning of the next project.
![]() Doug Rahn January 27th 2011, 4:46 pm
Doug Rahn January 27th 2011, 4:46 pm
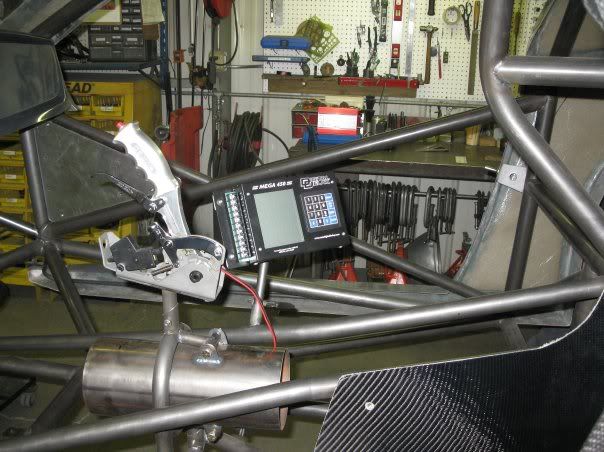
David Willingham wrote:Looks great Doug! Here's a pic of my DS tube:
That looks cool
Doug Rahn- BBF CONTRIBUTOR
- Posts : 1680
Join date : 2009-08-07
Age : 72
Location : Springfield, GA -
Re: The beginning of the next project.
![]() Doug Rahn January 27th 2011, 6:33 pm
Doug Rahn January 27th 2011, 6:33 pm
KY JELLY wrote:If Blake and I are able to construct a nice mold of his 65 and the first body turns out good I have full intentions of trying a complete carbon fiber body for myself . I don't care if its got paint on it or not I don't feel right driving a shiny race car anyway
Keep me updated on that project Randy
Doug Rahn- BBF CONTRIBUTOR
- Posts : 1680
Join date : 2009-08-07
Age : 72
Location : Springfield, GA -
Re: The beginning of the next project.
![]() Doug Rahn January 30th 2011, 6:43 pm
Doug Rahn January 30th 2011, 6:43 pm

Doug Rahn- BBF CONTRIBUTOR
- Posts : 1680
Join date : 2009-08-07
Age : 72
Location : Springfield, GA -
Re: The beginning of the next project.
![]() DILLIGASDAVE February 4th 2011, 3:30 am
DILLIGASDAVE February 4th 2011, 3:30 am
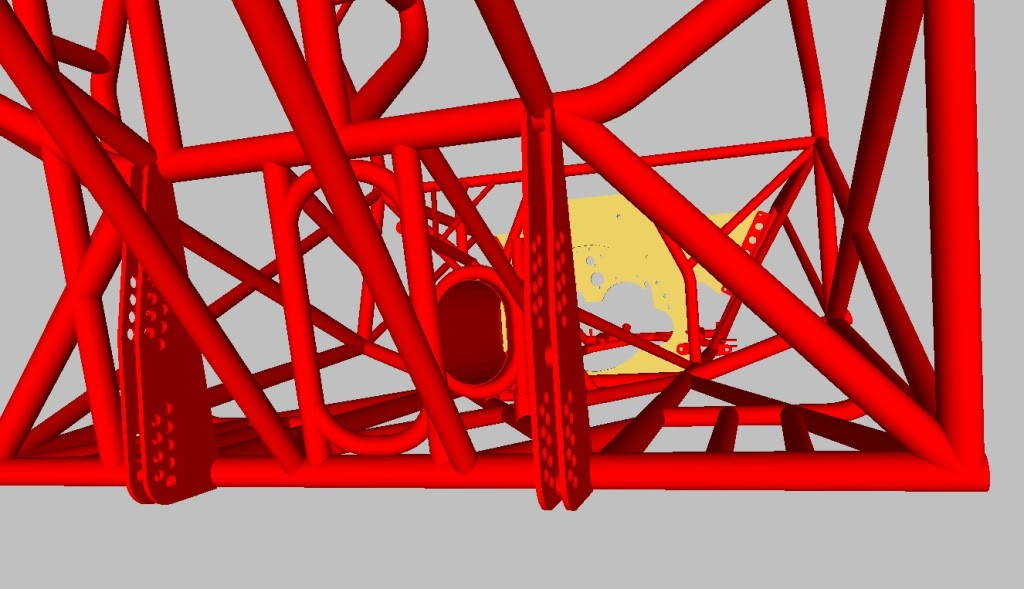
Since you raised/flattened the top of the motor plate, to save some weight you can also raise the bottom side too. Which line to follow depends on what might need to be hung/mounted off the bottom of the plate.
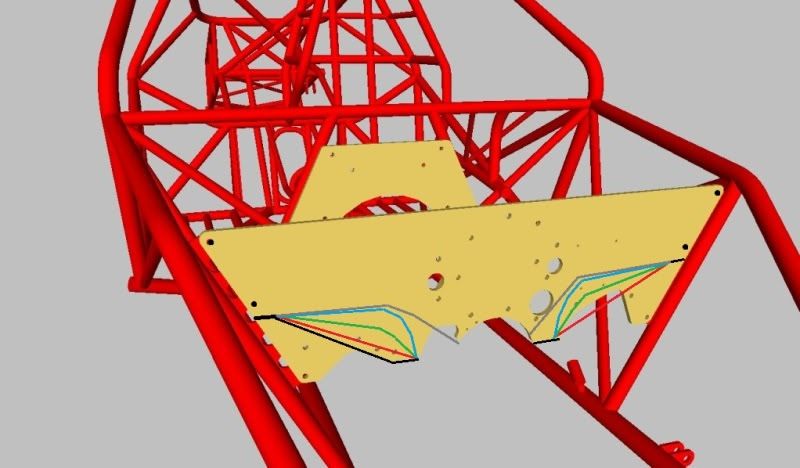
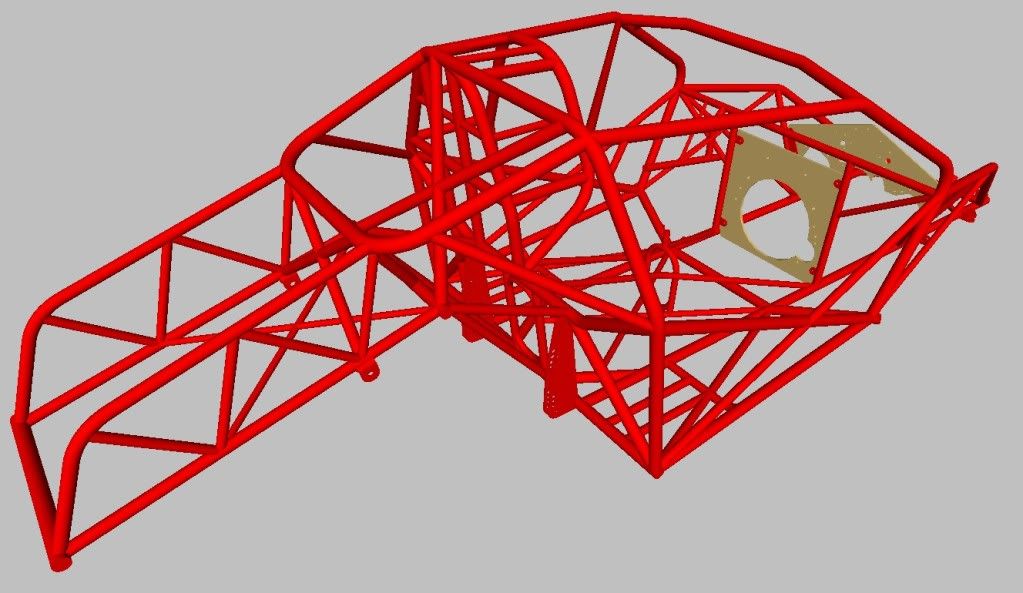
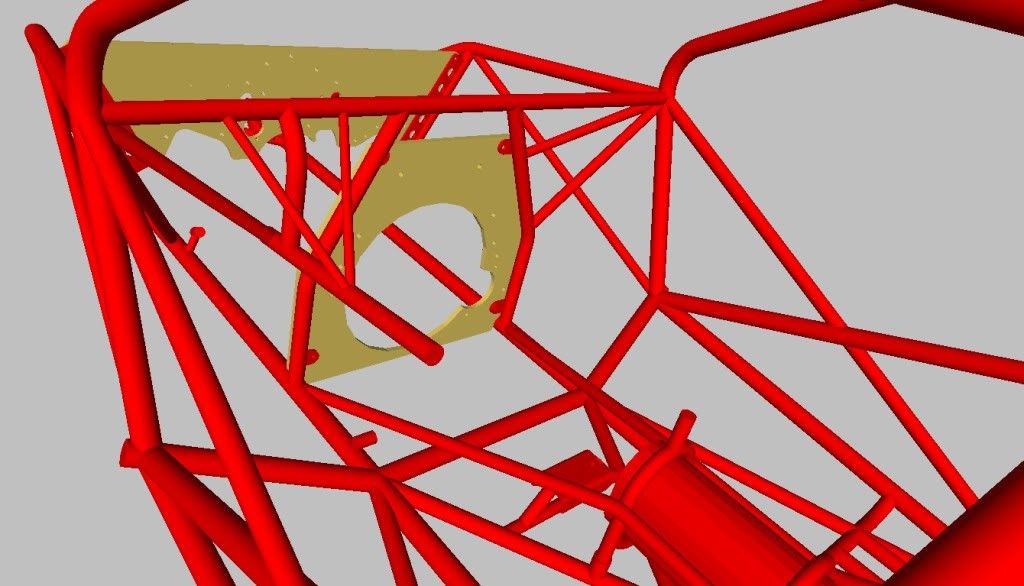
Some bracing could be added to help support the area where the back lower control arm mount and/or the motor plate upright attaches to the main frame rail. Usually it's two diagonals, (blue lines) but an "X" could be used instead as long as a center tow strap loop isn't used on the front crossmember. Also in the end your rack mounts might end up a little farther back. Depending on what strut is used the rack C/L might fall in the 8 - 10" range ahead of the front axle C/L with a normal width Pinto rack. If you end up needing the 5" narrower Pinto rack, that could change the final placement even more.

Dropping the center of the dash bar down a little to the top of the mid plate will add a little more "diagonal effect" helping transfer load from the plate to the outer cage bars. Plus it's a good way to seal the top of mid plate to rigid firewall surface without making the mid plate taller. The other small tube secondary firewall/floor diagonals I added were just because more diagonals is always more gooder.

You might also look at the possibility of making the diagonal double frame rail bars straight/straighter (instead of with multiple bends). Straight bars will be stronger/flex less under tension loading, but if the bend/bends have to be there to make room for the driver then there's not much you can do.
DILLIGASDAVE- Posts : 2262
Join date : 2009-08-08
Location : Texas. pronounced "texASS"
Re: The beginning of the next project.
![]() Doug Rahn February 4th 2011, 5:21 pm
Doug Rahn February 4th 2011, 5:21 pm
Doug Rahn- BBF CONTRIBUTOR
- Posts : 1680
Join date : 2009-08-07
Age : 72
Location : Springfield, GA -
Re: The beginning of the next project.
![]() BigDave65 February 4th 2011, 10:12 pm
BigDave65 February 4th 2011, 10:12 pm


BigDave65- Posts : 567
Join date : 2009-08-12
Age : 58
Location : Cliffside, NC
Page 1 of 2 • 1, 2 ![]()
|
|
|